Wednesday, 21 November 2012

How to Reset / Recover Windows 7 Administrator Password with USB | For All Versions Windows 7 / Windows XP / Windows Vista32 bit / 64 bit


First you have to make a bootable USB with this software to Reset Windows password

1. Download the file from the below Download Button and Extract it Must
Rar Password is www.2lets.com


2. Copy all the Extracted files onto ur USB (You do not need delete files already on the USB drive.)
Do not copy the files in any folder or sub-directory, copy those files directly in USB
 
3. Open command prompt (Run as Administrator by right clicking on Command prompt)
   Run this from a command line, like this:


j:\syslinux.exe -ma j:

replace j with the letter of your USB drive if it is on another
drive letter such as G , H etc.
After entering the command just wait for 10 seconds and then close the command prompt (your USB is ready now)
On some drives, you may have to omit the -ma option if you
get an error.
Please note that you may have to adjust settings in your computers BIOS
setup to boot from USB. To Boot from USB when your computer starts just press F12 rapidly until you 'll see boot menu. Then select the option Boot from USB and press enter.

Now the journey begins to reset your Windows Password ;)
Once it boots successfully, it will display below screen :
You just need to press Enter.


Then you 'll be shown the below image containing the drives on your system followed by numbers like 1,2,3,4 etc. then you have to select the number of your drive upon which you installed windows, mostly you install your windows on C drive so Just type 2 and press Enter.


The program will start to scan for the location of the registry files.
It’s very uncommon that the registry is not inside the default folders, so it shouldn’t have any problem locating it.

When the process is finished, it will display the path and you 'll be shown below image. Then Press “Enter” to continue.

 The program will list the registry content and you 'll be shown the below image. Then we 'll select the option "Password reset [sam system security]"
So Type 1 and press ENTER

Then you 'll be shown below image. Now we are going to select “Edit user data and passwords”.
Type 1 and press Enter :

It will show a list of the users that have been found on the system. as it is shown in below image such as Administrator, HomeGroupUser$, Guest, User etc. So we have to write the exact name (capital and small letter keep in mind, such as if the user name is Ali then do not write ali )
In this case I will use the Administrator. As i have written below the green arrow and then press "Enter". Of course you can change other users as well.

Then you 'll be shown the below image. Now we 'll select the option "Clear (blank) user Password" so Type “1″ (without the quotes) to clear the user password:
 You will see a message about "password cleared" will appear on your screen.

Do the following steps to make it permanent:
Step 1. Type “!” (without the quotes) & press Enter if you don’t want to clear more password accounts.
Step 2. Type “q” (without the quotes) & press Enter, the program will ask you if there is something to save.
Step 3. Type “y” (without the quotes) & press Enter.


The utility then ask if you want to run it again. Type "no" (without the quotes)
and press “Ctrl + Alt + Del” to finish the process.
Now you can use that user account again.
I have tested it many times. Its 100 % Working. If you find any problem during any step then do no hesitate to comment in below section :)

Saturday, 17 November 2012

MaryFi Download free | Turn your Windows 7 laptop into a Wi-Fi Hotspot


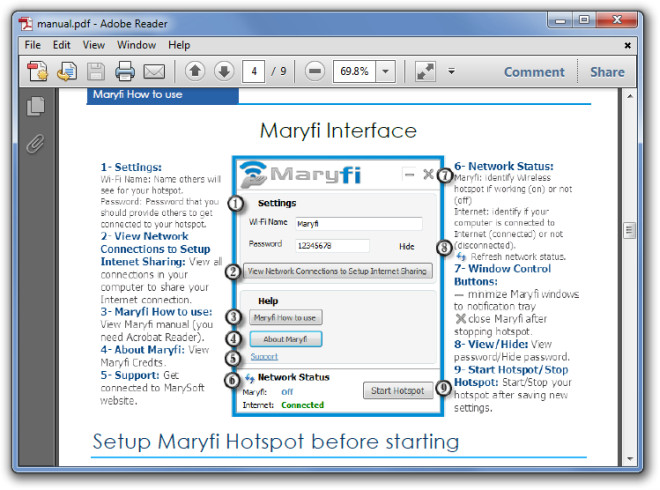
Maryfi Interface


How To USE MarFi Software

Now to start your Hotspot, just click on Start Hotspot button.


Wait a few seconds and you'll see Maryfi status changed to On

To Enable Connection Sharing click on the View Network Connections to Setup Internet Sharing button in the Maryfi Interface.

A window will come up. This window displays every connection you have in your computer (3G Mobile, Local Area Connection, Wireless Network Connection and your new Wireless Network Connection provided by Maryfi (Maryfi Connection)…etc.


If you are thinking of sharing your Mobile Internet connection (Mobile Broadband Connection 3 for example, seen in the previous window), right click on its icon and choose properties.


The mobile connection properties window is coming up. Move to Sharing Tab in the top.


Check Allow other network users to connect through this computer's Internet connection  (Yellow highlighting) and then click on select a private network connection (Blue highlighting) to choose Maryfi Connection.


After that click on Settings button to choose services you want to share


Check any service you like to share and then click ok button to close advanced settings Window, and on Ok button again to close the parent window (Mobile Internet Connection Properties).

After finishing of connection sharing your Network Connections should look like this one.


If you take another look to your wireless icon you'll see two connections, one your mobile connection and the other is your Maryfi connection, and the best of all there are two connections have access to the internet.
To see click on the signal's icon on taskbar. which i have showed in below picture

Then you 'll see this below frame containing "Maryfi" with Internet Access


If you want any further help or info then Click “MaryFi How To use” button on the main interface to open a PDF document with detailed instructions and general guidelines.
MaryFi works on Windows 7 only


Rar Password is www.2lets.com


Acronis True Image 2013 free download full version with Serial Key | Crack and Activation


Backup software comes in many different varieties -- file-based, disk imaging, synchronization tools, continuous data protection, and more -- which can make it tricky to identify precisely which package you need.

But if that sounds too much like hard work, then you could simply buy a copy of Acronis True Image 2013, which can handle just about anything you might want to do.
The program is able to back up selected files and folders directly from the Explorer right-click option, for instance. And there are options to create images of your drives or partitions; synchronize folders on your PC, network, external drive, phone or tablet; or monitor your system, backing up new or changed files every few minutes for the maximum possible security.

Your data can then be burned to disc, saved to local or network drives, uploaded to your own FTP server, or (for an extra $49.99 annual subscription) transferred to 250GB of online server space at Acronis True Image Online.

A host of configuration options then allow you to decide your preferred backup method (full, incremental, differential), version control options, compression level, encryption, scheduling and more.

There are plenty of thoughtful touches here. You can limit True Image 2013′s network connection speed, for instance, so it won’t hog all your bandwidth. While backup validation isn’t simply the usual binary on/ off option; you can also choose to validate your backups at a specified frequency -- once a month, say -- giving you some reassurance that everything’s fine, without too much of a speed hit.

Recovery options are just as versatile, with you able to restore backups partially or full, from the True Image 2013 interface, via a boot disc, or even the Startup Recovery Manager (just press F11 as your PC boots to launch a recovery environment where you can access and restore your archives).

All this power doesn’t make the program hard to use, though, as a straightforward interface keeps most options hidden unless you really need them. Getting started, for instance, is as easy as clicking “Back up system”. True Image 2013 will automatically choose your source drives; if you’re happy with the default settings, all you have to do is select a destination drive and click “Back up now”.

New Features
There’s no shortage of powerful features here, then, but what you won’t get in True Image 2013 is a great deal that’s new, not at least in terms of the program’s core functionality.

Acronis have made some reasonable low-level tweaks, for instance -- simplified installation, easier archive management, improved stability -- but nothing too exciting.

True Image 2013′s support for Windows 8 is welcome, too, although hardly a great surprise.

And so the headline addition is probably True Image’s new ability to synchronise your data with mobile devices (both iOS and Android). It’s easy to use, and will be welcome if you need it, but of course you’ll need to purchase a subscription to True Image Online ($4.99 monthly, $49.99 a year) to see the benefit of this. While there’s a free trial, Acronis don’t provide a free account: not even a miserly 2GB.

If you already have True Image 2012, this new release doesn’t look like a compelling upgrade. Unless you’re planning an imminent move to Windows 8 -- or, maybe, you really need mobile sync -- we’d give this one a miss for now.

If you’re new to the package, though, it’s a very different story. Acronis True Image 2013 is a comprehensive and versatile program, highly configurable, with plenty of useful bonus tools, and it’s an excellent choice for anyone who needs real backup power.


Click Below Download Button to Download its Torrent

Friday, 16 November 2012

Hotspot Shield Software free download full version


Hotspot Shield is a free program that allows you to secure your connection while surfing WiFi hotspots and to access sites not normally available outside of the USA, like Huluand Pandora.

How does it work?
To secure your internet connection, Hotspot Shield creates a Virtual Private Network (a secure connection, usually abbreviated to VPN) between your computer and the Hotspot Shield developer's website, Anchorfree, based in the USA. This connection makes websites think that you are based in the US.

Everything is done in an extra tab open in your browser, so there's no need to configure anything. A green and red shield in your system tray indicates when Hotspot Shield is or is not connected.


Wednesday, 14 November 2012

How to activate Windows 8 for free with Rearm Technique

There are many techniques are being used now a days to Activate Windows 8 but those are based on flaws and malwares which can effect your PC or even can hack you, However there are some activator on internet which really work but for windows 7, not for Windows 8 as we don't have any working KMS server based Windows 8 activator till yet. If there 'll be any then i 'll must share with you.
So now i share a simple solution with you people to run your windows 8 for more than trial period by activating Rearms. Rearm is a inbuilt feature by Windows which allows you to extend trial period of Windows 8.


You can rearm the evaluation and make it run more than 90 days after expiration of Trial Period.

1. If you wanna see Current License Information of your Windows, type the command slmgr /dli
2. To see detailed info of the current license type, type the command slmgr /dlv
3. To check expiration date of the current license, type the command slmgr /xpr
4. If you want to extend the current license grace period again and rearm Windows, type command
slmgr /rearm
(To enter command Run Command prompt as Administrator)
One thing keep in mind that It is not necessary to enter all above commands, these are given just for information. you can perform step number 1 and 4 only


After Running Rearm Commands:


Now you have done all............!!!
Some Questions which can be in your mind...
  • When should I run these steps of commands for maximum validity?
 It is better or recommended to run command on 89th day so that 90 days get added to trial from that date.
  • How many times can I rearm Windows 8 Trial?
you can rearm it 3 Times.
  • Is it possible to reset Windows 8 rearm count to run it indefinitely or activate it for unlimited time period?
It is possible. Keep visiting our site to be updated regarding activation of Windows 8 :)

Wednesday, 7 November 2012

Stardock Start8 v1.16 Free Download Full Version Final with Serial key | Patch


Bring back the Windows® "Start" menu with Start8™!

Microsoft Windows® 8 is shipped without the "Start" menu. Stardock heard the cries from Windows 8 users We put the "Start" menu back in Windows 8. We accurately recreated the most used desktop feature billions of users depend on every day and packed it with additional functionality.

Return the Start Button to Windows 8
Windows 7-style Start menu with Windows 8 enhancements
Search for Windows 8-style (Modern UI) apps
Pin desktop and Metro apps to the start menu
Jump List support
Unified Search for apps, settings and files
Boot directly to the Windows 8 desktop
One click access to shut down, devices, music, documents, and videos

Start8 is a customization application that brings back the traditional Windows start menu without compromising using the Windows 8 Modern UI start screen.

Many people will be confused by Windows 8's new Modern UI. Start8 will bring back the start menu you know and love while still giving you full access to the Windows 8 Modern UI. When you select the Windows 7 style start menu, you'll feel right at home if you've been using Windows Vista or 7, although there's no 'Aero' transparency. If you select the Windows 8 style in Start8, you'll be given a Modern UI style app list.

While other Windows 8 start menu replacement apps try to hide the Modern UI from users, Start8 gives you a choice of how to activate it. Since many features in Windows 8 rely on having the Modern UI, it's great that Start8 provides this flexibility. For example, you can set what clicking the Start8 icon activates or what the Windows key on the keyboard activates.


Rar Password is www.2lets.com


Sunday, 4 November 2012

Microsoft Office 2013 Free Download Full Version 64 bit / 32 bit with Serial Key


Microsoft released the preview version of Office 2013 less than a week ago. This new installment of the productivity suite has many of the same features as its previous versions, 2003, 2007, and 2010: Word, Excel, Access, PowerPoint, and Outlook. But there are other programs as well, and Microsoft has connected the Office Suite to the Azure Cloud.

In this review I’ll discuss the requirements for installation and the installation process. I’ll also discuss the contents of three of the Office 2013 suite programs, Word, Excel and PowerPoint, and how the cloud-based Office 365 may change the way many users work with the suite. I’ll also talk about Windows 8 integration, and wrap up with a discussion about the impact that Office 2013 can have in business enterprises.


For Starters: The Requirements

Okay, let’s talk about the requirements for Office 2013. It will run on Windows 7 and Windows 8, on desktop PCs, notebooks, tablets, and mobile phones, or on Windows Server 2008 R2 or later. The Office 2013 family includes a large number of desktop apps as well as server products like Exchange and SharePoint. Office 2013 will not run on Windows XP or Vista; this means that more than half of all computers currently running Windows will need an upgrade first.

Component Office 2013 Preview Requirements
Computer and processor 1 gigahertz (Ghz) or faster x86- or x64-bit processor with SSE2 instruction set
Memory (RAM) 1 gigabyte (GB) RAM (32 bit); 2 gigabytes (GB) RAM (64 bit)
Hard Disk 3.0 gigabytes (GB) available
Display Graphics hardware acceleration requires a DirectX10 graphics card and 1024 x 576 resolution
Operating System Windows 7, Windows 8, Windows Server 2008 R2, or Windows Server 2012
Browser Microsoft Internet Explorer 8, 9, or 10; Mozilla Firefox 10.x or a later version; Apple Safari 5; or Google Chrome 17.x.
.NET version 3.5, 4.0, or 4.5
Multi-touch A touch-enabled device is required to use any multi-touch functionality.
Installation. So you decide to get Office 2013. Now what? First you must download and install the preview edition. You will be guided to the Windows Live ID screen, to get access. When you sign in you are given the option to download a Click-to-Run installer that handles the entire installation online. You must remain connected to the Internet until the installation is complete.

One new feature is that you can install Office 2013 on up to five PCs. The system allows you to deactivate the installed copy of Office from one or more devices so that you can install it on a new device. Once the installation is in place, you will see the suite appear on the start menu, in programs.

Roaming Apps, With the attention given to using Office on different devices, what if you want to use an app that is not installed, is that possible? A new feature, Roaming Apps, will allow you to use an individual app on a device where Office 2013 is not installed. First, sign in to your Microsoft Office account, open SkyDrive, and then open a document using the Office Web App. Click or tap File and then click or tap Edit to display the screen. But Roaming Apps is just one of the features, here are others.

The 2013 Office Suite

So what are the main differences between Office 2013 and 2010? Microsoft has moved Office to the cloud, just as it did with the Windows 8 operating system. What this means is that Office users can benefit from synchronization features to work with their own personal settings on all computers they sign in to.

The settings are stored in Microsoft's cloud and synced automatically with SkyDrive, SharePoint and local drives Office is launched from.

This opens another interesting possibility, as you can continue to work on a document even if you switch computers, for instance after leaving work and going home.

Users who sign in to Office will automatically have Office select SkyDrive as the preferred save location for documents.

Word 2013. Here is what you get with Word. New templates and design tools help you put the finishing touch on documents, and you’ll find new and updated ways to share and work with others. There is an improved screen-reading experience. How? Well a new Read Mode Text reflows automatically in columns to make it easier to read. And Object Zoom allows you to view tables, charts, images, or online videos, a finger tap or mouse click in greater detail. When you’re done, another tap or click returns them to their original size.


Also, Word automatically bookmarks your last-visited spot. So if you step away, and return you can pick up where you left off-- even if you are on a different PC or tablet.

File Saving and File Sharing: First your documents are saved online to SkyDrive or SharePoint by default. So you can send anyone a link to the same file, along with their viewing and editing permissions. They will see the latest version. And that is not all, because you can also share your document with others even if they don’t have Word. Do this by sending them a link, so as you read through the document on your screen, they can also follow along on their browsers.

Excel 2013. 
Microsoft’s second standup software program, Excel brings some new features. The overall configuration is the same. There are nine tabs. File, Home, Insert, Design, Page Layout, Formulas, Data, Review, View, and Add-Ons.

But there are several areas that stand out. The first is better accessibility. Excel users will be able to have a better grasp of their content and what they can do with it. This means that there will be guidance on how to make graphs and charts look better.


Plus Excel 2013 now supports multiple monitors. You can have two Excel workbooks open at once. There are also new Business Intelligence capabilities.

Two pieces of software for Excel 2010 -- PowerPivot and SharePoint -- are now integrated into Excel 2013. So sharing spreadsheets will be possible. Excel Everywhere is a new addition. Microsoft is making sure that people will be able to access their Excel documents on any device wherever they are, just like Word.

Finally, with Excel 2013, apps can be designed for Excel using HTML5. These apps will work on both the standalone Excel environment and the cloud-hosted Web app. Now let’s look at the tabs.

PowerPoint 2013
Our final review will be on the PowerPoint differences between the 2013 and 2010 versions. PowerPoint is a presentation program used for showing information while a presenter is giving a talk. In structure, PowerPoint is the same in the two versions. They both have 10 tabs, File, Home, Insert, Design, Transition, Animations, Review, View, and Add-ins. But the overall program has some interesting features.
You can work on the same version with others at the same time. You can make you presentation look more interesting with wide-screen themes, plus you can add videos, pictures, and shapes, and create customized icons. Then there are the design elements that you have available. You can use the Union, Combine, Fragment, Intersect, and Subtract tools to merge two or more shapes into the shape you want. You can select a theme, add a design variant, and align text and pictures.


Windows 8 Integration

As mentioned before, Office 2013 will only run on Windows 7, Windows 8, or Server 2008 R2 or later. Of especial importance is how this Office Suite will integrate with Windows 8. Microsoft has made a large commitment to the new operating system. This commitment comes from the fact that they are geared to change how Windows works with PCs.

The big move for Microsoft is not Metro, but touch. The touchscreen will change the character of user interaction. Sure at the beginning there will be resistance, but over time users will look at the touch technology as the best thing since sliced bread. Why? Because it will be more natural to use. The keyboard and mouse won’t disappear but they will have their use changed


Businesses and Office 2013
Looking at the upcoming changes from a business perspective, why should a business make the jump to Office 2013? There are some negatives.

1. The upgrade factor. Office 2013 won’t run on the older operating systems, XP or Vista; only Windows 7 or Windows 8. This means that there will have to be a hardware upgrade to stay current.

2. Training. That’s always a hiccup. If users are working with Office 2007, or Office 2010, they can use their current technology skills and upgrade to the new set as needed, not all at once. This should not be a drawback.

3. Upgrades. Companies will have to upgrade, eventially. So why not upgrade to the most current version now? To that end, Microsoft will offer a server-side release of Exchange 2012, SharePoint 2012, and Lync 2012. These programs will provide access to the new collaborative features built into Office 2013. This will be an inducement for IT to not hang back as usual.


Click Below Download Button to Download Torrent for 64 Bit System


Download Activator for Office | Rar Password is www.2lets.com